Thank you for choosing the Donation Plugin! We’re truly excited to have you on board, and we’re confident this plugin will make your website more impactful and rewarding.
The Donation Plugin for WooCommerce is a powerful yet user-friendly solution that allows store owners to collect donations seamlessly within their online store. With just one click, administrators can enable or disable donation options, ensuring complete flexibility to match any business or nonprofit need.
Once enabled, the plugin adds a dedicated Donation Section to the WooCommerce checkout page—positioned after the cart total and before the payment gateway—encouraging customers to contribute with preset amounts or a custom donation field.
On the backend, the plugin provides a robust admin customization panel, where you can easily manage donation content, styling, and layout. From editable titles and subtitles to customizable preset buttons, input fields, and the “Update Donation” button, every element can be styled to match your store’s branding. The DonateBox Design section also offers a live preview, so you can instantly see how your changes will look on the checkout page.
Key Features & Support:
- Donation on Checkout Page
Add a donation form directly on WooCommerce product pages. Customers can enter a donation amount alongside their product. - Donation on Single Product Pages
Add a donation form directly on WooCommerce product pages. Customers can enter a donation amount alongside their product. - Donation via Shortcode
You can place donation forms anywhere on your website using the shortcode: - Custom Email Template
Create and customize email templates sent to donors after a successful donation. You can include donor name, donation amount, and any custom message. - Donor Management
Track all donations and donors from the admin dashboard. Features include: View all donors and donation amountsExport donor data as CSVFilter by date, campaign, or productSend follow-up emails to donors
In short, this plugin is designed to:
• Give customers multiple, easy ways to donate.
• Provide store owners with full control over donation settings and design.
• Integrate seamlessly with WooCommerce without complex setup.
🖥️ System Requirements & Recommendations
Before installing Donation Wp Pro, please make sure your site meets the following requirements:
✅ Minimum Requirements
- WordPress Version: 6.0 or higher
- Tested Up To: WordPress 6.8
- PHP Version: 7.4 or higher
- MySQL Version: 5.6 or higher (recommended: 5.7+)
- WooCommerce: Required – must be installed and active
- Elementor (Free): Required for Elementor widgets
(Note: Elementor Pro is not required. Donation Wp Pro works perfectly with the free version.)
⚡ Recommended Setup
For the best performance and compatibility, we recommend:
- WordPress Version: Latest stable release (6.8 or higher)
- PHP Version: 8.0 or higher
- WooCommerce Version: Latest stable release
- Elementor Version: Latest free version
🛠️ Support for Donation Wp
Thank you for choosing Donation Wp Pro! We’re committed to providing you with reliable and friendly support to ensure you get the best experience with our plugin.
Our support team is available through Live Chat and Email, ready to help you with setup, troubleshooting, and general questions.
📩 How to Get Support
1. Live Chat
For quick help, you can reach us through our Live Chat system on our website:
👉 https://teamnrb.com
2. Email Support
If you prefer email, simply contact us at:
📧 connect@teamnrb.com
When emailing us, please include:
- Your purchase email/license key
- A detailed description of the issue
- Screenshots or error messages (if any)
- Your WordPress + WooCommerce version numbers
This helps us resolve your issue faster.
⏳ Support Coverage
When you purchase Donation Wp Pro, you receive 6 months of hands-on support.
- You may choose to extend support for 6 or 12 months at a small additional cost.
- Extended support ensures continued access to our team for bug fixes, guidance, and troubleshooting.
For more details, you can read Envato’s article: What Is Item Support?
Before Contacting Support
To help speed up your request, please check the following first:
- Make sure you are using the latest version of Donation Wp Pro, as well as the latest versions of WordPress, WooCommerce, and Elementor.
- Review our plugin documentation to see if your question is already answered.
- Try disabling any third-party plugins to check if the issue is a conflict.
- Temporarily switch to the default WordPress theme (Twenty Twenty-Four) to see if the issue persists.
If the issue disappears, it may be theme-related.
If the issue continues, it’s likely related to Donation Wp Pro, and we’ll be glad to help.
Quick Tips
- Keep your WordPress, PHP, WooCommerce, and Elementor versions updated.
- Always back up your site before making changes.
- If you encounter a bug, please provide as much detail as possible — this helps us fix it faster.
Our mission is to make Donation easy, flexible, and enjoyable for you. We’ll do our best to support you every step of the way.
Installing Donation Wp Pro Plugins
Once you’ve purchased Donation Wp Pro from CodeCanyon, follow the steps below to install and activate it on your WordPress site.
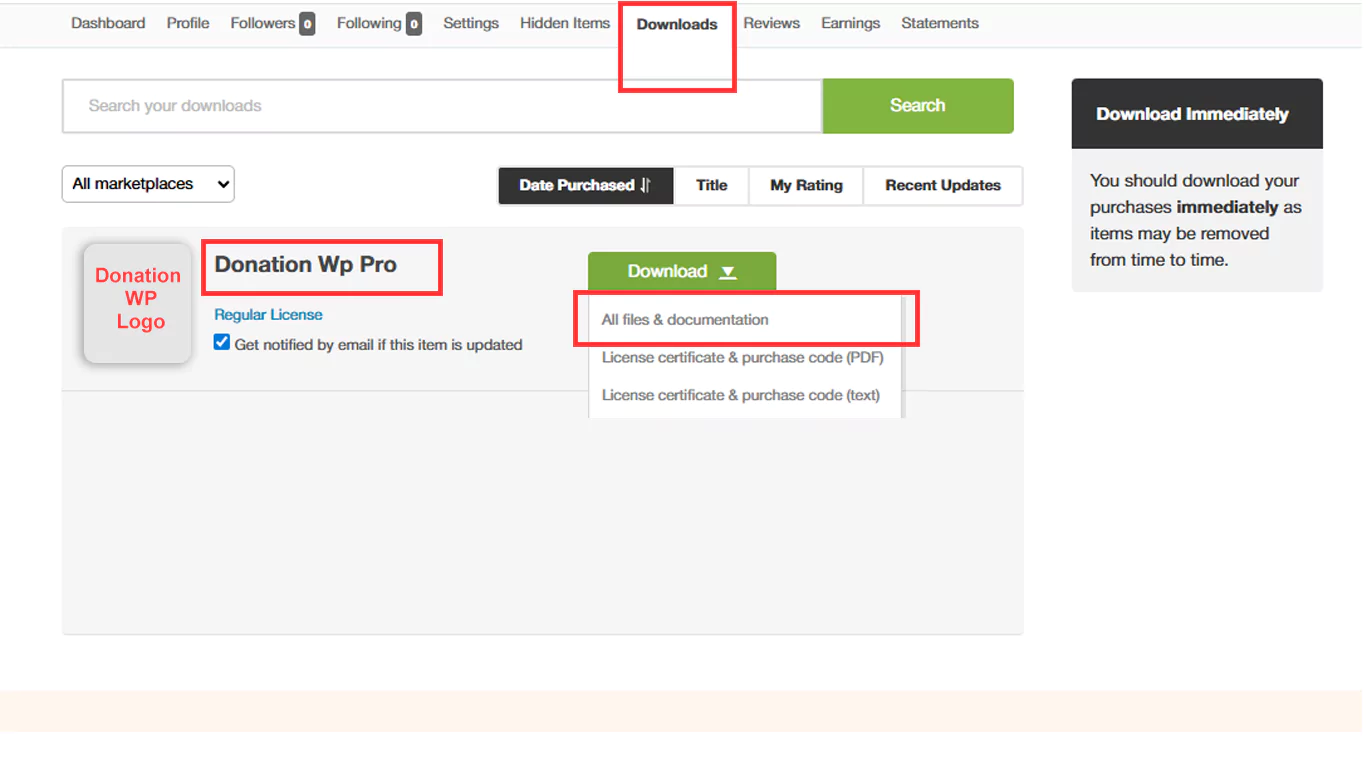
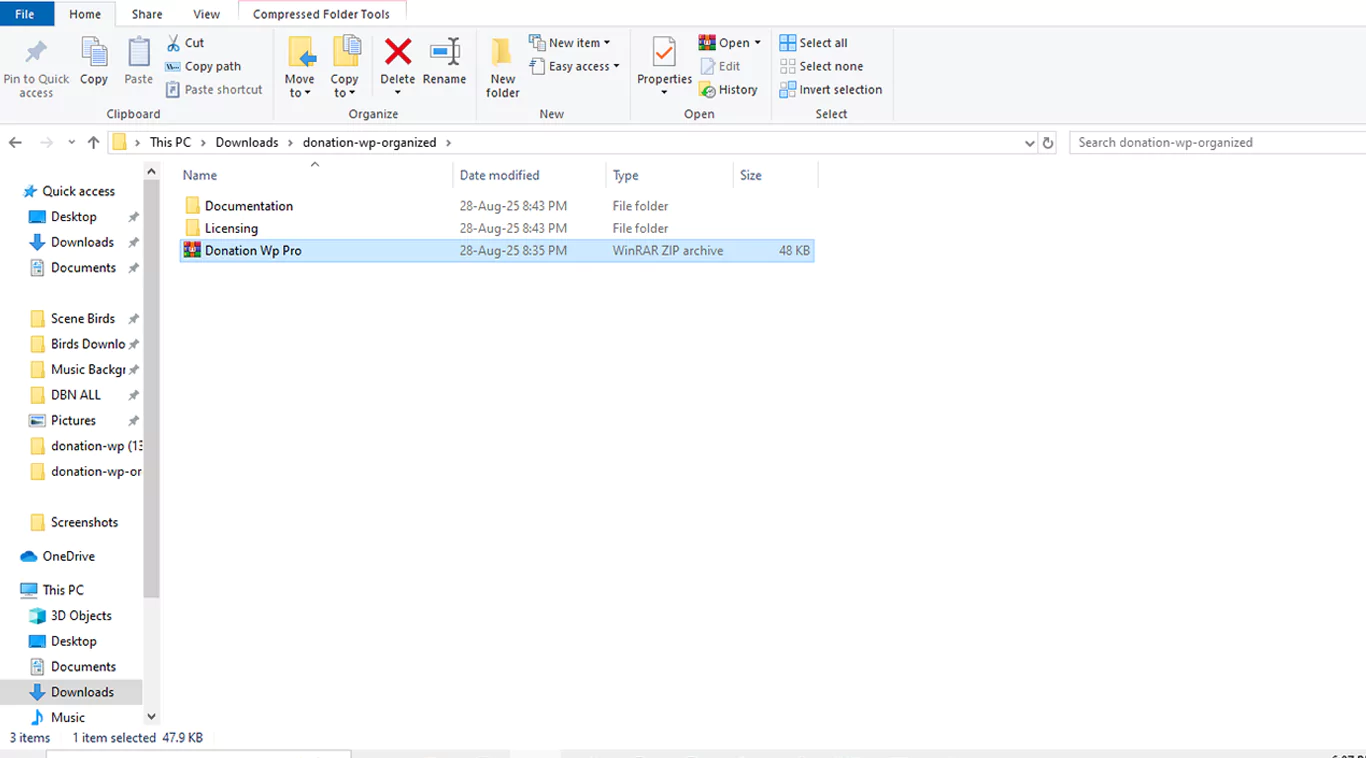
Step 1: Download the Plugin Package
- Log in to your CodeCanyon/Envato Market account.
- Navigate to your Downloads section.
- Find Donation Wp Pro in your purchased items list.
- Click the Download button and choose “All Files & Documentation.”
Here is the Screenshot:
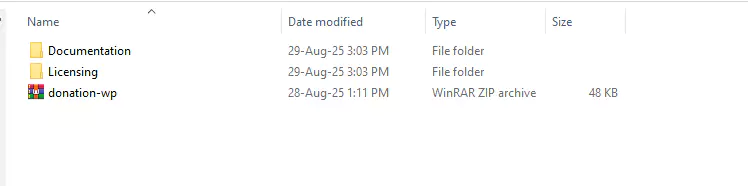
A ZIP file will be downloaded to your computer. This package includes:
- The Donation WP Pro installable plugin file
- Documentation
- License information
Screenshot:
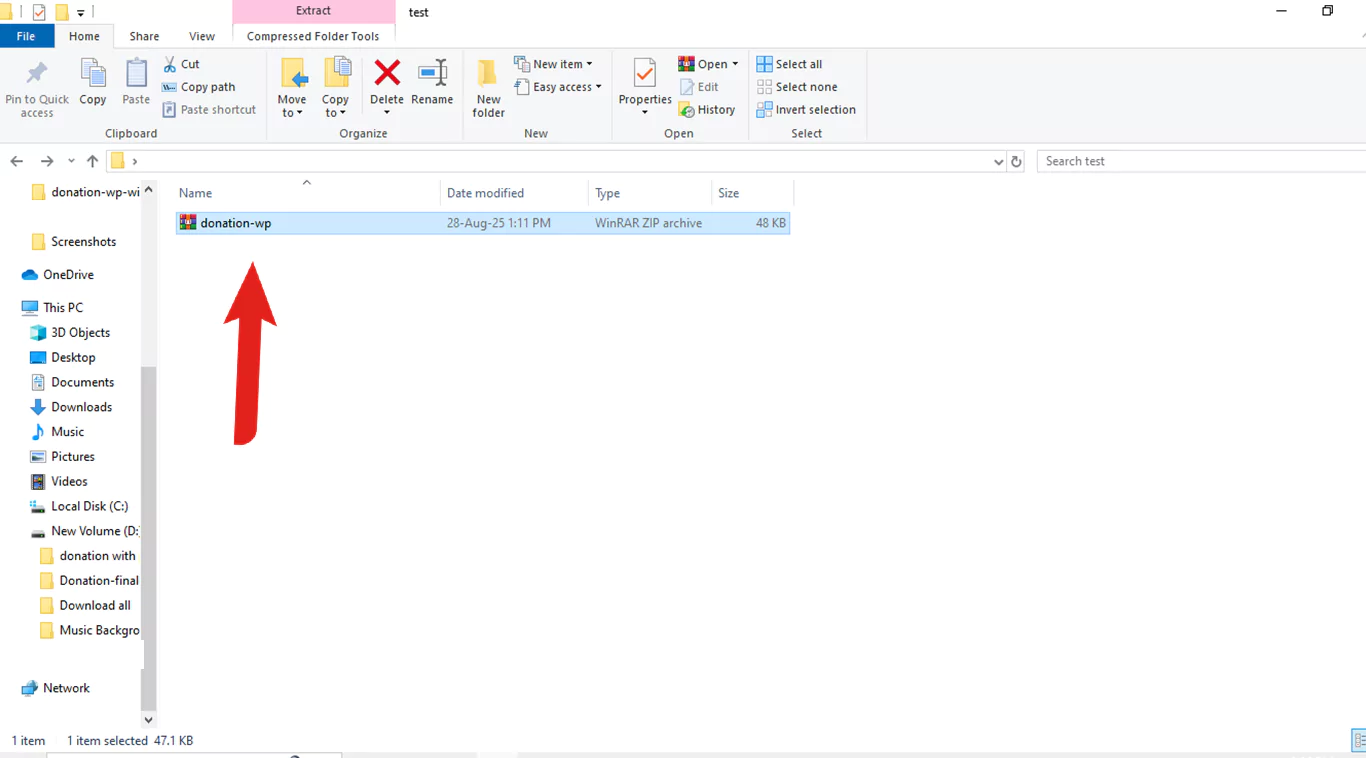
Important: Do not upload the full package directly into WordPress. First, unzip the file on your computer and locate the installable ZIP (usually named "donation Wp Pro.zip" )
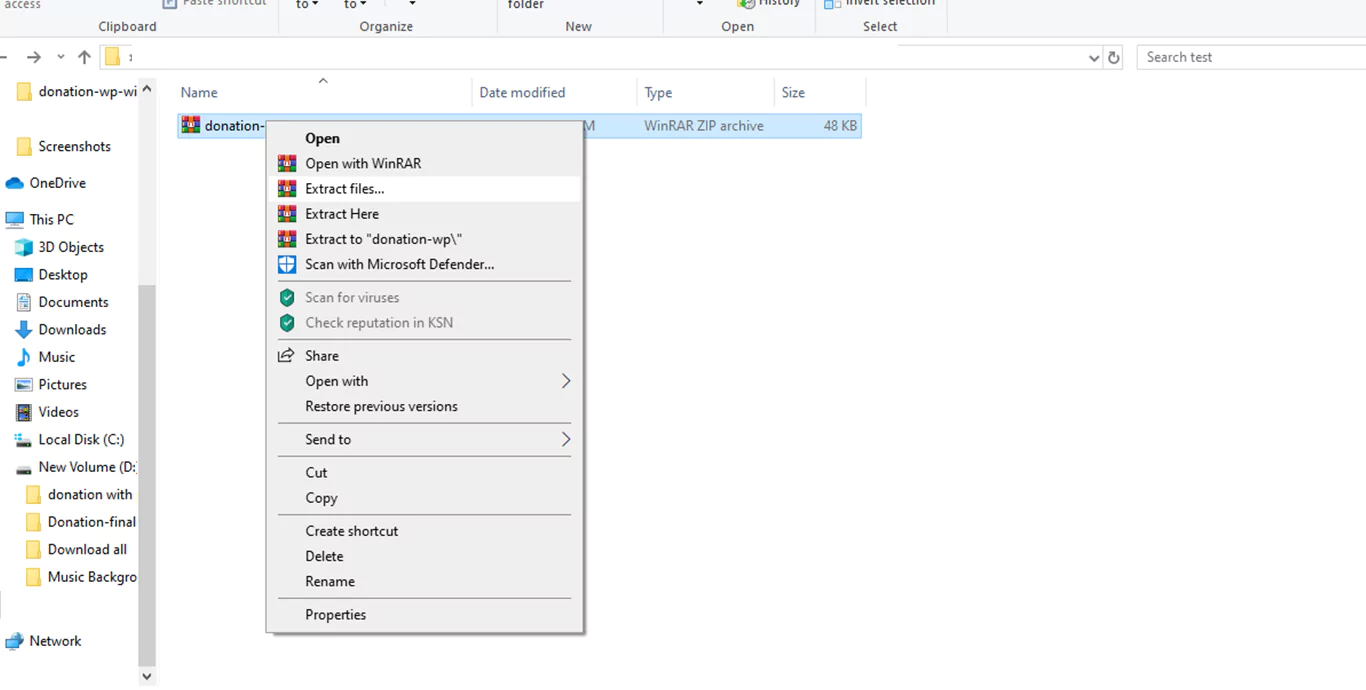
Right Click And Extract the File first On your Computer
After Extract file you will see all file (Screenshot attach)
Step 2. Install the Plugin in WordPress
1. Log in to your WordPress Admin Dashboard.
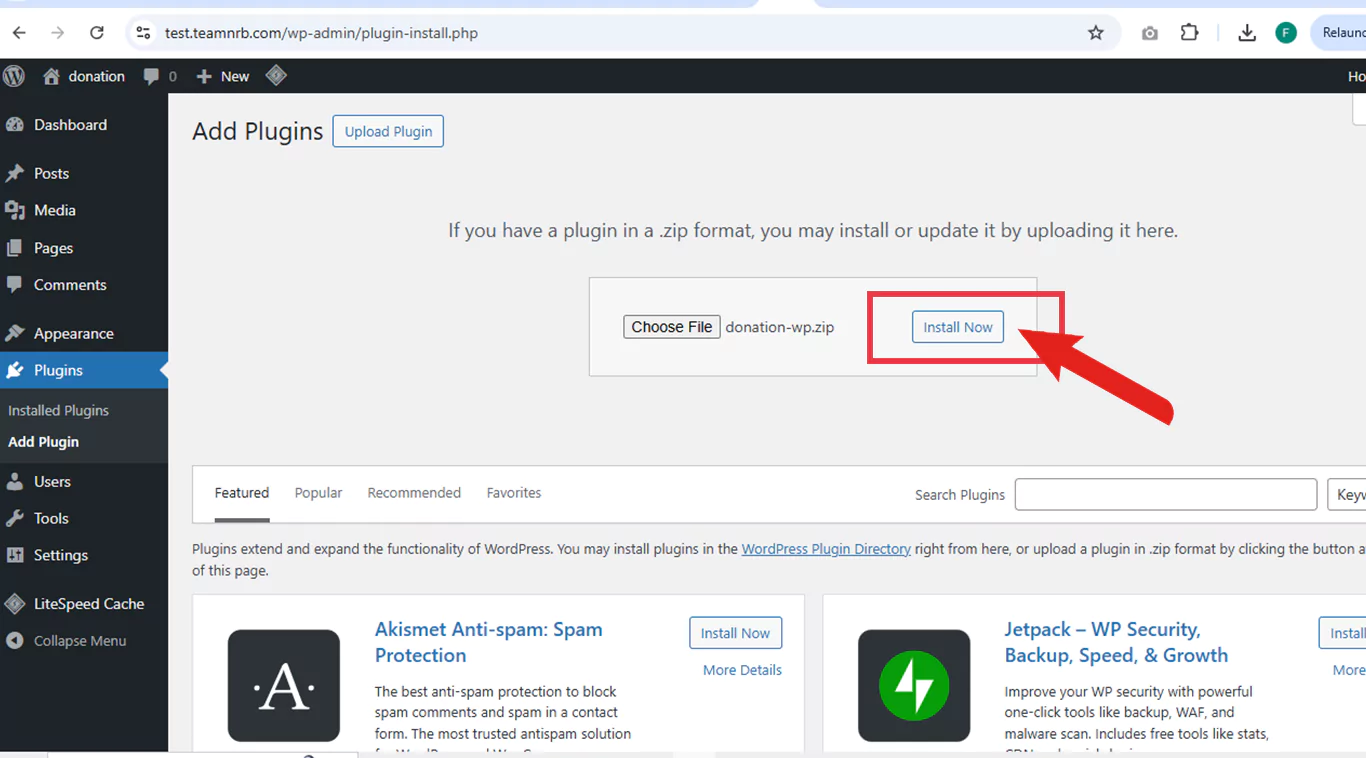
2. Go to Plugins → Add New → Upload Plugin.
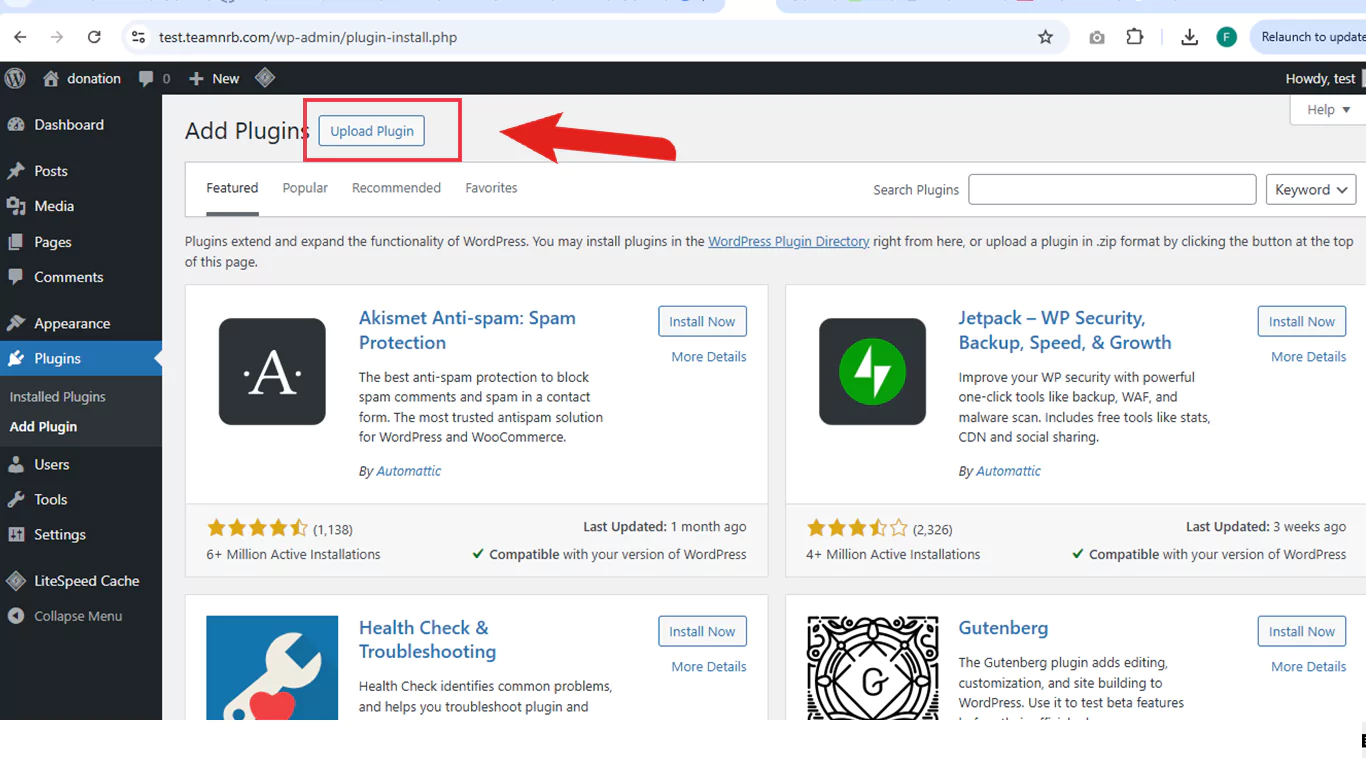
3. Click Choose File, then select the Donation WP Pro.zip file (installable file from step 1).
4. Click Install Now.
(screenshot placeholder: Installing plugin)
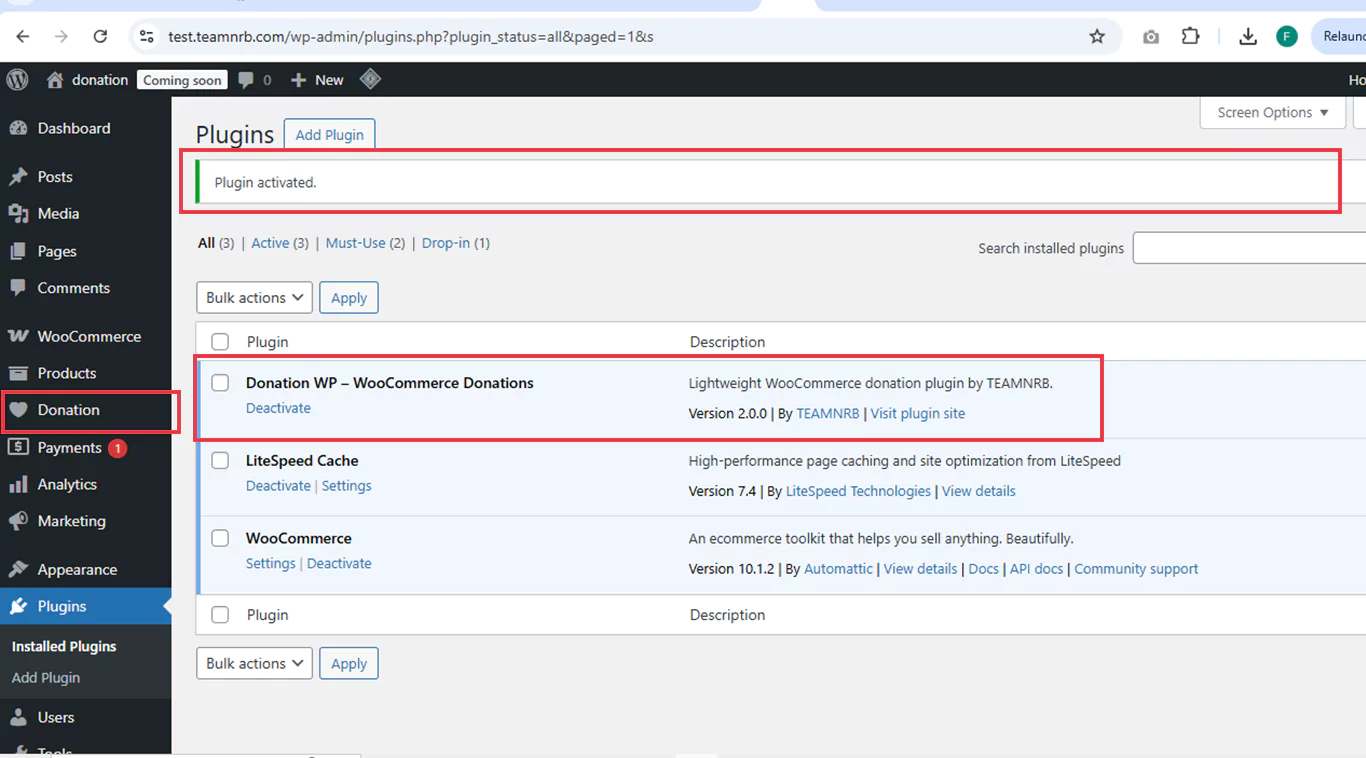
After installing the plugin, WordPress will automatically upload and unpack the files. Once the process is complete, you’ll see a message confirming that the plugin has been unpackaged successfully. At this point, you’ll be prompted to activate the plugin. Simply click the Activate Plugin button to start using it.
5. Activate the Plugin,
Once installation is complete, click the Activate Plugin button.
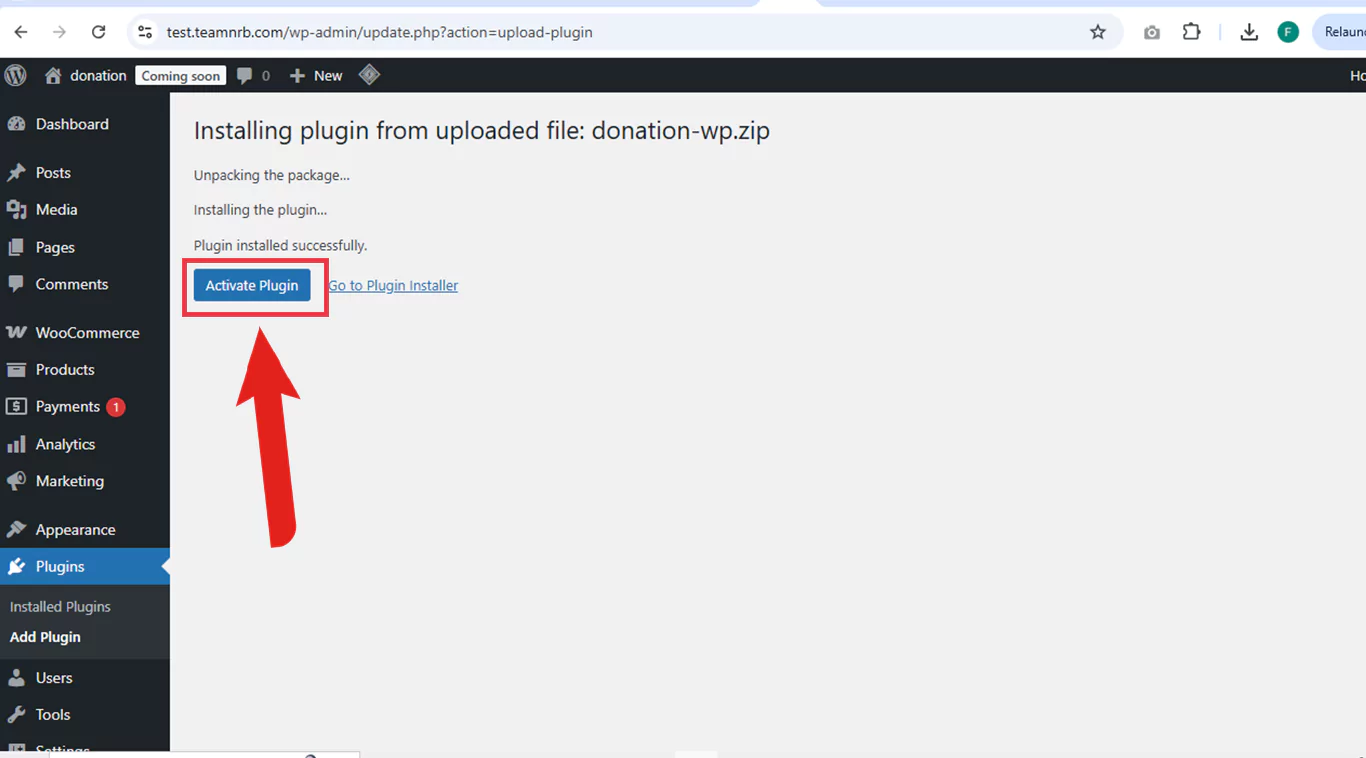
After activation, you’ll see a confirmation message that the plugin has been activated. At the same time, a new menu item called “Donation” will be added to your WordPress dashboard, giving you access to all plugin settings and features.
Verify WooCommerce & Elementor
Since Donation Wp Pro plugins works alongside WooCommerce and Elementor, make sure both are installed and activated:
• WooCommerce → Required
• Elementor (Free) → Required for Elementor Widgets
• (Elementor Pro is not needed — Donation Wp Pro works with the free version.)
You’re Ready!
That’s it! You’ve successfully installed and activated Donation Wp Pro Plugins. You can now head to the Donation Settings to enable donation forms, customize the design, and start receiving donations on your site.
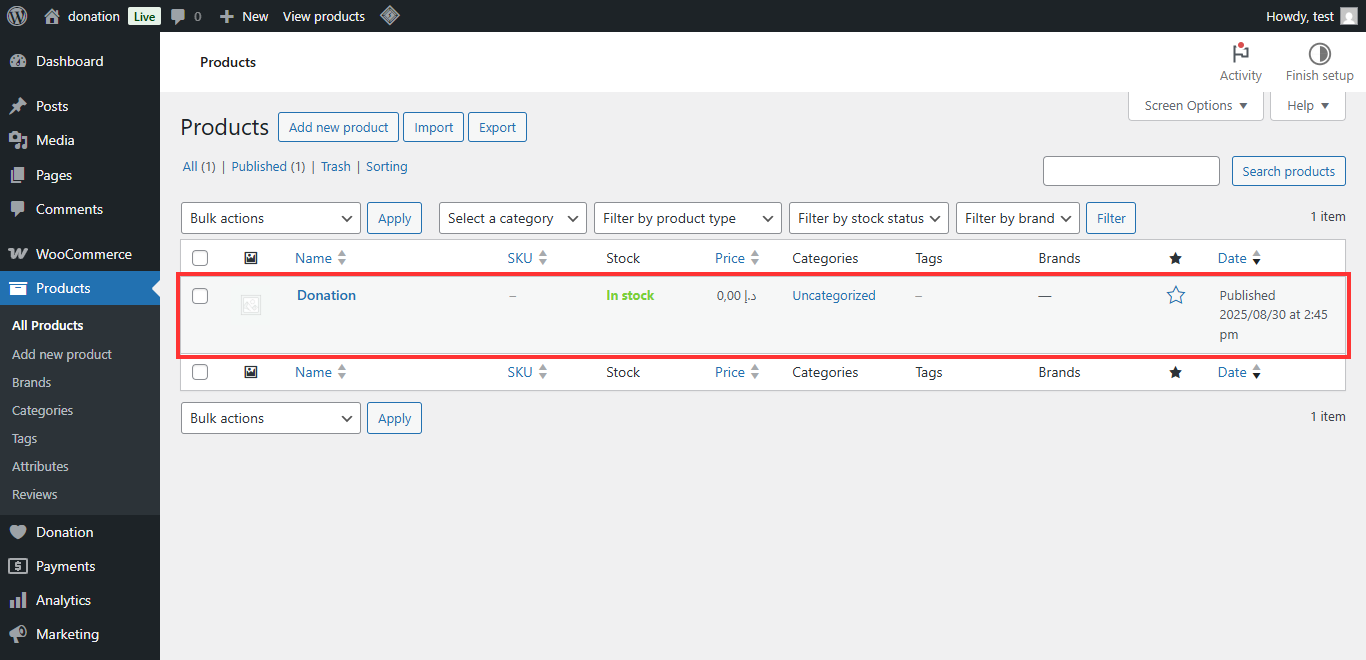
Virtual Donation Product (Created Automatically)
When you activate Donation WP, the plugin will automatically create a virtual donation product in WooCommerce. This product is required for the plugin to run smoothly and to properly track all donation records.
Here are a few important points about this product:
Hidden from the shop – The donation product will never appear on your WooCommerce shop or product pages. It only works in the background.
Automatic settings – The plugin sets a default SKU, category, and price of $0.00 for this product.
Do not edit or delete – You don’t need to make any changes to this product. Leave it as it is so the donation system works without errors.
Backend only – This product exists only to make donations function properly. Your customers will never see it.
⚠️ Note: Please do not modify or delete this product, as it may cause technical issues with donation tracking.
Screenshot
WP-Donation Shortcode Guide:
You can display your donation form anywhere on your site using a simple shortcode.
A. Displaying the Donation Form Shortcode
The shortcode can be fully customized with different attributes. By adjusting these attributes, you can override the default settings directly in the shortcode.
Example customizations you can do:
- Change the main title: title="Donate Now" → "Donate Please"
- Change subtitle text: subtitle="Make a Big Change with a Little Help"
- Enable or disable preset buttons: presets="5,10,50,100"Separate each amount with a comma. You can add any amounts you need.
- Show or hide custom amount field: custom_amount="yes" or "no"
- Change Button Text: button_text="Donate Now" → "Add to Cart"
Use this if you want to style and configure the donation form differently for different pages or sections.
[donation_widget title="Donate Now"
subtitle="Make a Big Change with a Little Help"
presets="5,10,20,50"
enable_custom="yes"
button_text="Donate Now"]Donation on WooCommerce Single Product Page
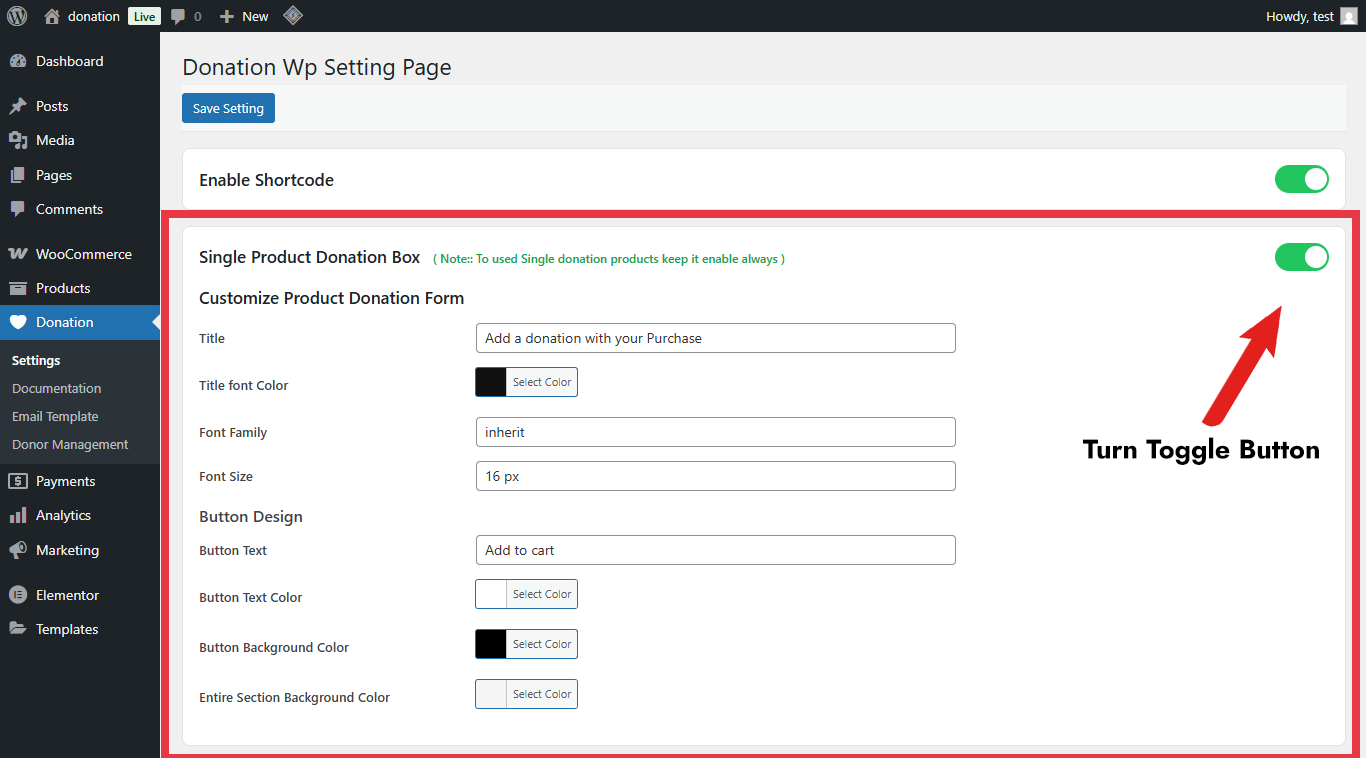
This feature allows you to add a donation form directly on WooCommerce product pages. Customers can add a donation amount while viewing a product.
>Important Note: Always keep the toggle switch enabled to use this feature.
You will find the toggle in the WordPress admin:
As soon as the toggle is enabled, the donation form will automatically appear on all single product pages with default settings.
Features
- Customizable donation field: Change the title, placeholder, and button text.
- AJAX-powered: Adds donations to cart without page reload.
- Compatible with WooCommerce-friendly themes.
- Toggle ON/OFF via admin settings for complete control.
How It Works
- The customer views a product page.
- The donation field appears above the Add to Cart button.
- Customer enters an amount in the input field.
- Clicking Donate adds the donation to the WooCommerce cart instantly via AJAX.
- Cart totals update immediately, with the donation listed as a separate line item.
Customization Options
Once the toggle is ON, you can customize the donation form to match your theme:
- Change Title Text – Make the heading match your site tone.
- Change Placeholder Text – Customize the input field placeholder.
- Change Button Text – Adjust the button text for better engagement.
- Adjust Font & Colors – Modify font family, size, background, and text colors to fit your product page style.
Tip: Default settings are applied automatically when enabled. Customization is optional and only needed to match your theme or branding.
Screenshot example:
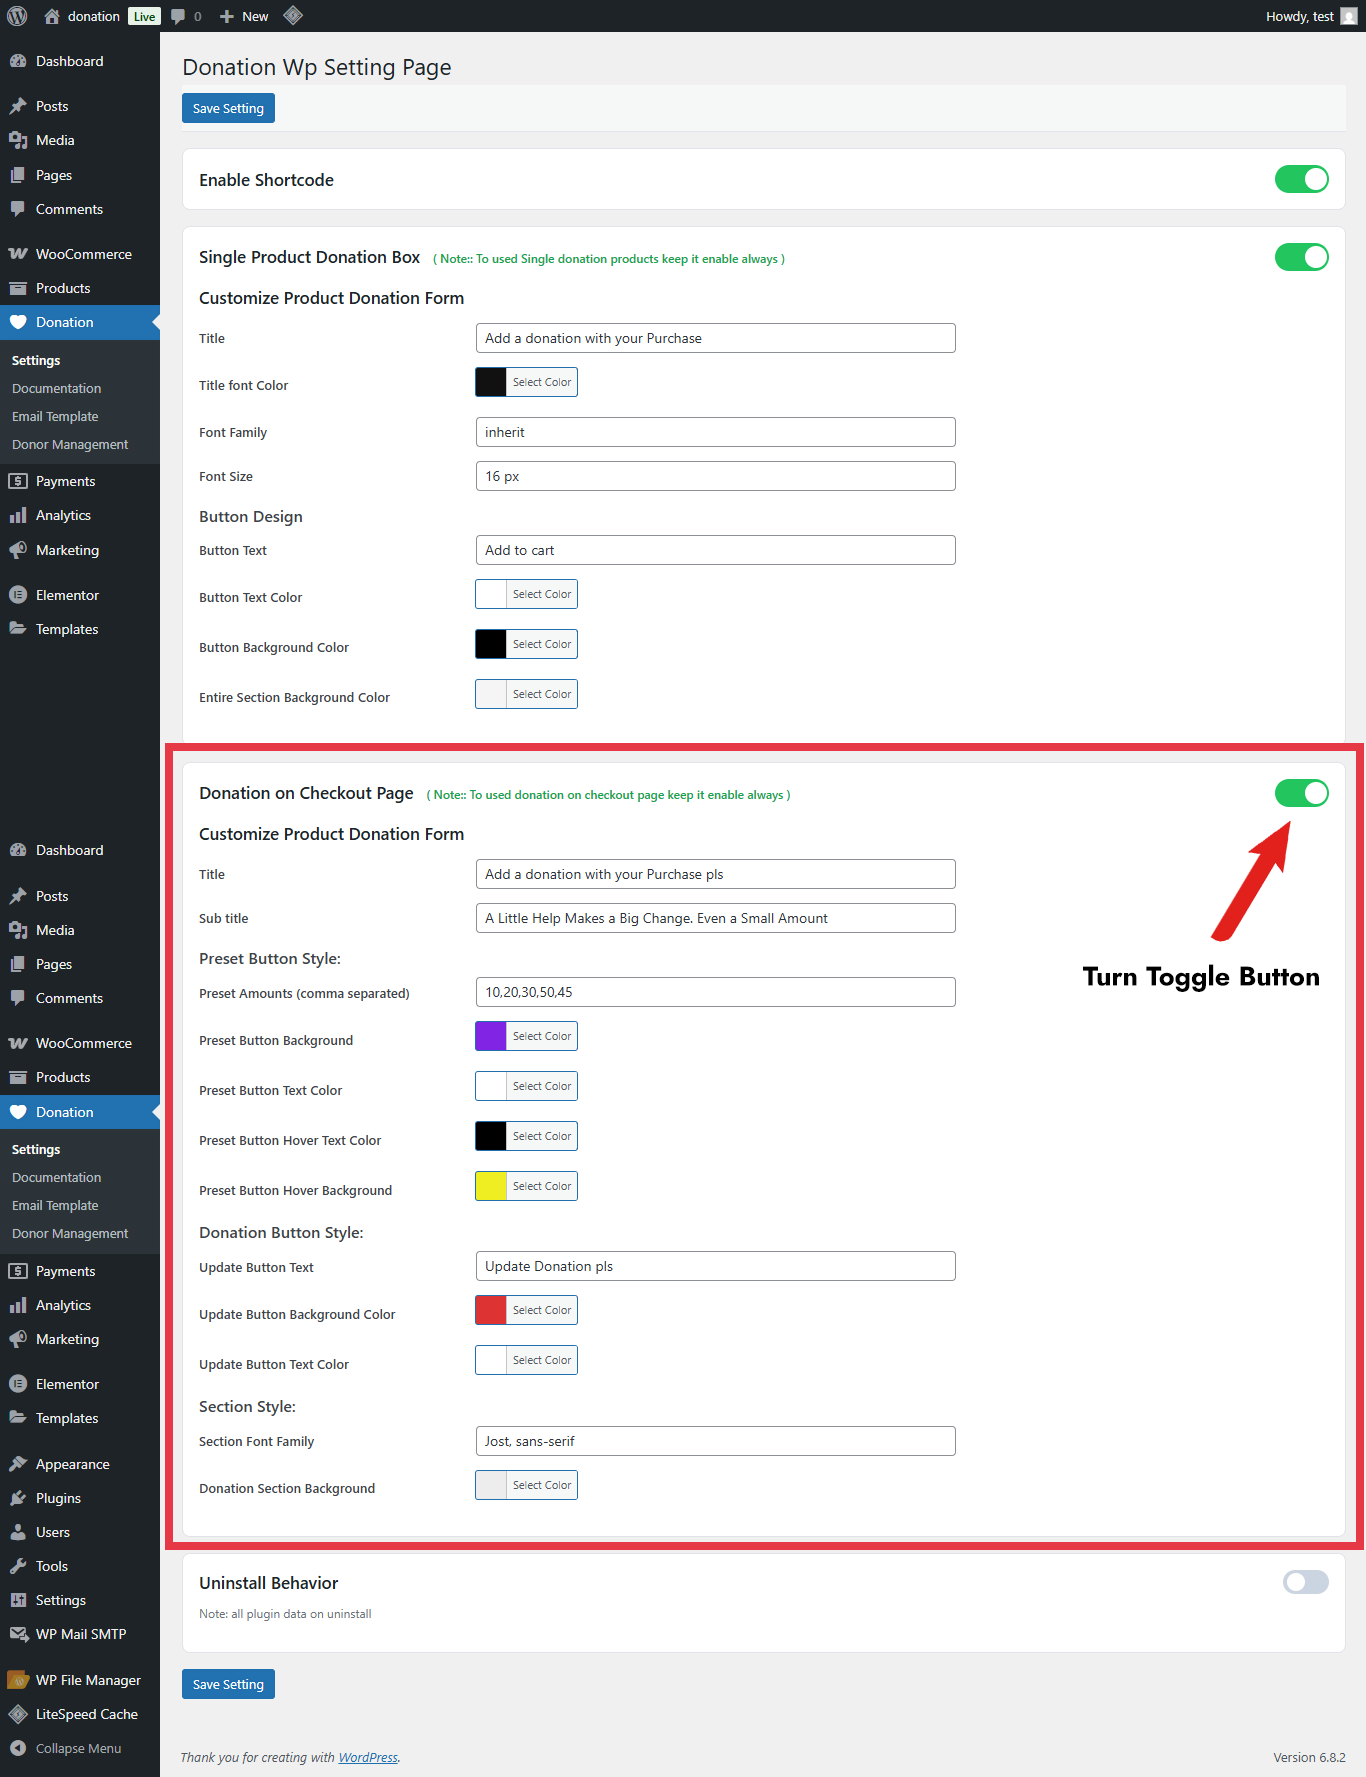
Donation on WooCommerce Checkout Page
This feature lets you display a donation box directly on your WooCommerce checkout page. It appears after the cart totals and before the payment methods, so customers can easily add a donation before completing their order.
✨ Key Features
- Show a donation section at checkout.
- Add preset donation buttons (example: $10, $20, $30, $50).
- Allow customers to enter a custom donation amount.
- Donations are added to the cart in real time (no page reload).
- AJAX updates for smooth experience.
- Fully customizable (text, colors, buttons, styling).
⚙️ Where to Find Settings
Go to your WordPress Dashboard.
- Navigate to Donation WP → Settings.
- Scroll to the section “Enable Donation forms on Checkout Page”.
- Toggle the switch to ON.
👉 Once enabled, all customization options for the checkout donation box will appear.
📝 How to Configure
When you turn ON the toggle, you’ll see two main areas:
1. Content Tab:
Here you control the texts and labels.
- Title – Default: “Donate Now” (you can rename it).
- Subtitle – Default: “A Little Help Makes a Big Change. Even a Small Amount Can Make a Difference. Donate Now.” (fully editable).
- Preset Amount Buttons – By default: $10, $20, $30, $50.
- You can add, edit, or remove amounts.
- Custom Amount Option – A “Custom Amount” button will show an input box where users can type their own amount.
- Update Donation Button – Default text: “Update Donation” (editable).
2. Style Tab:
Here you control the design.
You can customize:
- Title and subtitle (color, font, size).
- Preset buttons (background, text color, border, hover effects).
- Custom amount input box (background, text color, border, font).
- Update Donation button (colors, padding, hover effects).
💡 Each option is easy to adjust with simple color pickers and dropdowns. No coding required.
🛒 How It Works (Frontend)
Customer visits checkout page.
They see the donation box with preset amounts (example: $10, $20, $30, $50).
They can click a preset button OR choose Custom Amount.
When they click Update Donation, the donation is instantly added to their cart.
The cart total updates in real time, showing the donation added.
Customer completes checkout as usual.
⚠️ Important: If you are using a custom checkout page built with Elementor or other page builders, the donation box may not appear correctly. Always test after enabling.
Check the screenshot below
What this feature does?
The Donation Widget lets you add a donation box to any page using Elementor. Visitors can pick a preset amount, enter a custom amount, leave an optional note, and click Add to Cart to add the donation to their WooCommerce cart—quietly and instantly.
Before you start
WooCommerce is installed and active.
Elementor is installed and active.
Donation WP is installed and activated (it creates a hidden “Donation” product automatically for tracking—no action needed).
Using Donation Widget
Open your WordPress Dashboard.
Go to Pages → choose a page (or create a new one) → click Edit with Elementor.
In the Elementor panel (left side), search for Donation Widget (you’ll see a ❤️ heart icon).
Drag and drop it anywhere on your page.
2. Customizing the Content (Content Tab)
Inside the widget settings (left panel), you’ll find options to control what text and fields appear:
- Donation Title – Default: Donate Now.
→ You can rename it (e.g., Support Our Mission). - Sub Title – Default: A Little Help Makes a Big Change. Even a Small Amount Can Make a Difference. Donate Now.
→ Edit this to match your campaign. - Preset Donation Amounts – Default: $10, $20, $40, $100.
→ You can add, remove, or change amounts. Each amount appears as a clickable box. - Custom Amount Field – Option to let donors enter their own amount.
→ Toggle On/Off as needed.
→ Default placeholder: Enter your amount (you can change this text). - Donation Note (Optional) – A box where donors can write a message.
→ Toggle On/Off.
→ Default text: Write a note for your donation (Optional). - Donation Button – The button that adds the donation to the WooCommerce cart.
→ Default text: Add to Cart.
→ You can change this (e.g., Donate Now, Contribute).
3. Designing the Widget (Style Tab)
Every part of the donation box is fully customizable under Style:
- Title & Subtitle Design – Change font, color, and typography.
- Donation Buttons – Customize background, hover effect, borders, and text style.
- Custom Amount & Note Fields – Change input box colors, borders, and typography.
- Final Donate Button – Style for Normal and Hover states (color, background, padding, shadow, etc.).
- Additional Style – Control background color/gradient, alignment (left, center, right), padding, and margins.
4. How Donations Work
When a donor selects a preset amount (e.g., $20) or enters a custom amount and clicks Add to Cart, it will instantly be added to their WooCommerce cart under the product name “Donation”.
The donation product is hidden from your shop — it only appears when donors use the widget.
At checkout, donors can complete their payment along with any other products (if applicable).
Version 1.0 – Initial release of the plugin. This is the first version available for upload.
